Albert Enstein

Science without Religion Is Lame, Religion without Science Is Blind!

Ali bin Abi Thalib

Tiada kekayaan lebih utama daripada akal. Tiada kepapaan lebih menyedihkan daripada kebodohan. Tiada warisan yang lebih baik daripada pendidikan.

Qur’an Al mujadalah 11

"Niscaya Allah akan meninggikan beberapa derajat orang-orang yang beriman diantaramu dan orang-orang yang diberi ilmu pengetahuan beberapa derajat."

Hadits - Sahih Ibnu Majah

"Siapa yang Allah kehendaki menjadi baik maka Allah akan memberikannya pemahaman (ilmu) terhadap Agama.".

ahm.united

Hidup adalah proses didalamnya ada pembelajaran tiada henti untuk sabar dan syukur... untuk menyempurnakan tempat di keabadian...

Tuesday, May 28, 2013

Jim Geovedi: Hacker Indonesia yang bisa Meretas Satelit

Jim Geovedi: Hacker Indonesia yang bisa Meretas Satelit


Seorang hacker Indonesia membangun reputasi dunia. Dia terkenal karena bisa meretas satelit.
Jim Geovedi adalah orang yang berbahaya. Pada masa ketika nyaris semua informasi dan manusia terkoneksi, Jim, jika dia mau, bisa setiap saat keluar masuk ke sana: melongok percakapan surat elektronik atau sekedar mengintip perselingkuhan anda di dunia maya.
Lebih dari itu, dia bisa saja mencuri data-data penting: lalu lintas transaksi bank, laporan keuangan perusahaan atau bahkan mengamati sistem pertahanan negara.
“Kalau mau saya bisa mengontrol internet di seluruh Indonesia,“ kata Jim dalam percakapan dengan Deutsche Welle. Saat saya tanyakan itu kepada pengamat IT Enda Nasution, dia mengaku percaya Jim Geovedi bisa melakukan itu.
Saya memilih percaya dan tidak mau menantang Jim untuk membobol situs Deutsche Welle.
Dia adalah hacker Indonesia dengan reputasi global: hilir mudik Berlin, Amsterdam, Paris, Torino, hingga Krakow menjadi pembicara pertemuan hacker internasional yang sering dibalut dengan nama seminar sistem keamanan. Dalam sebuah pertemuan hacker dunia, Jim memperagakan cara meretas satelit: ya, Jim bisa mengubah arah gerak atau bahkan menggeser posisi satelit. Keahliannya ini bisa anda lihat di Youtube.
Jim Geovedi sejak 2012 pindah ke London dan mendirikan perusahaan jasa sistem keamanan teknologi informasi bersama rekannya. Dia menangani para klien yang membutuhkan jasa pengamanan sistem satelit, perbankan dan telekomunikasi. Dua tahun terakhir, dia mengaku tertarik mengembangkan artificial intelligence komputer.
Tapi Jim Geovedi menolak disebut ahli. Dalam wawancara, Jim lebih suka menganggap dirinya “pengamat atau kadang-kadang partisipan aktif dalam seni mengawasi dari tempat yang jauh dan aman.“
Tidak, Jim bukan lulusan sekolah IT ternama. Lulus SMA, Jim menjalani kehidupan jalanan yang keras di Bandar Lampung sebagai seniman grafis. Beruntung seorang pendeta memperkenalkan dia dengan komputer dan internet. Sejak itu, Jim Geovedi belajar secara otodidak: menelusuri ruang-ruang chatting para hacker dunia.
Deutsche Welle
Apa saja yang pernah anda hack?
Jim Geovedi
Saya tidak pernah menghack…kalaupun ya, saya tidak akan mengungkapkannya dalam wawancara, hehehe. Tapi saya banyak dibayar untuk melakukan uji coba sistem keamanan. Saya punya konsultan perusahaan keamanan untuk menguji aplikasi dan jaringan. Klien saya mulai dari perbankan, telekomunikasi, asuransi, listrik, pabrik rokok dan lain-lain.
Deutsche Welle
Bagaimana anda membangun reputasi sebagai hacker?
Jim Geovedi
Saya tidak memulai dengan menghack sistem, kemudian setelah terkenal membuka identitas dan membangun bisnis sistem keamanan. Sejak awal, saya lebih banyak bergaul dengan para hacker dunia ketimbang Indonesia, dan dari sana saya sering diundang menjadi pembicara seminar atau diwawancara media internasional. Beberapa tahun setelah itu saya mulai diperhatikan di Indonesia. Tahun 2004, saya diminta membantu KPU (saat itu data pusat penghitungan suara Pemilu diretas-red) yang kena hack. Saya disewa untuk mencari tahu siapa pelakunya (seorang hacker bernama Dani Firmansyah akhirnya ditangkap-red). Ketika wireless baru masuk Indonesia tahun 2003, saya sudah diminta menjadi pembicara di Kuala Lumpur tentang bahaya sistem itu. Tahun 2006, saya diminta menjadi pembicara isu sistem keamanan satelit, dan itu yang mungkin membuat nama saya naik.
Deutsche Welle
Apakah anda bisa menghack satelit?
Jim Geovedi
Ya bisa, satelit itu sistemnya cukup unik. Orang yang bisa mengontrol satelit harus tahu A sampai Z tentang isi satelit. Dan satu-satunya cara adalah anda harus masuk ke ruang operator atau berada dalam situasi kerja sang operator (dengan meretasnya-red). Dari sana anda akan memahami semua hal: satelit ini diluncurkan kapan, bagaimana cara kontrol, sistem apa yang digunakan. Setelah itu anda akan bisa memahami: oh di sini toh kelemahan sistemnya. Itu semua total insting. Semakin sering anda mempelajari kasus, jika berhadapan dengan kasus lain, anda akan bisa melihat adanya kesamaan pola. Kalau anda sudah melihat kesamaan pola, maka anda akan tahu.
Deutsche Welle
Satelit mana saja yang pernah anda hack?
Jim Geovedi
Hahaha…saya harus berada di lingkungan operatornya.
Deutsche Welle
Tapi anda bisa masuk ke lingkungan itu dari jarak jauh (meretas-red) kan?
Jim Geovedi
Hahaha, untuk satu atau dua kasus itu bisa dilakukan.
Deutsche Welle
Satelit mana yang anda hack?
Jim Geovedi
Itu satelit klien saya hahaha…satelit Indonesia dan satelit Cina.
Deutsche Welle
Apa yang anda lakukan dengan satelit itu?
Jim Geovedi
Saat itu saya diminta menguji sistem keamanan kontrol satelit, dan saya melihat: oh ini ada kemungkinnan untuk digeser atau dirotasi sedikit… lalu ya saya geser…dan itu membuat mereka panik karena agak sulit mengembalikan satelit itu ke orbit. Untung mereka punya bahan bakar ekstra. Mereka bilang: oke cukup jangan diteruskan. Satelit yang dari Cina bisa saya geser tapi kalau yang dari Indonesia saya ubah rotasinya.
Deutsche Welle
Dengan kemampuan seperti ini, bagaimana anda mengatasi godaan?
Jim Geovedi
Kalau mau, saya bisa mengontrol internet seluruh Indonesia. Saya bisa mengalihkan traffic (lalu lintas data-red), saya bisa mengamati traffic yang keluar ataupun masuk Indonesia. Saya bisa memodifikasi semua transaksi keuangan…dengan kapasitas saya itu mungkin saja dilakukan. Tapi buat apa? Saya termasuk orang yang bersyukur atas apa yang saya punya. Saya nggak punya interest berlebihan soal materi.

sumber : http://dw.de/p/17V7h 

Tuesday, May 21, 2013

The Seven Earths

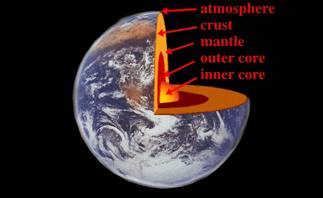
A simple image of Earth and the interior layers.  Windows to the Universe, at (http://www.windows.ucar.edu) at the University Corporation for Atmospheric Research (UCAR).  ©1995-1999, 2000 The Regents of the University of Michigan; ©2000-05 University Corporation for Atmospheric Research.
The Sunnah of Prophet Muhammad is the second revealed source of Islam.  Like the Quran, it contains scientific information unavailable 1400 years ago.  From these miracles is the “seven” earths, mentioned by the Prophet in several of his sayings.  From them are the following two:

Hadith 1

It was narrated on the authority of Abu Salamah that a dispute arose between him and some other people (about a piece of land).  When he told Aisha (the Prophet’s wife) about it, she said, ‘O Abu Salamah!  Avoid taking the land unjustly, for the Prophet said:
“Whoever usurps even one span of land of somebody, its depth through the seven earths will be collared to his neck.” (Saheeh Al-Bukhari, ‘Book of Oppression.’)

Hadith 2

Salim narrated on the authority of his father that the Prophet said:
“Whoever takes a piece of land of others unjustly, he will sink down the seven earths on the Day of Resurrection.” (Saheeh Al-Bukhari, ‘Book of Oppression.’)
The aforementioned hadith prohibits oppression in general, especially the taking of a piece of land belonging to others unjustly.  What might the seven earths refer to?
Studies in geology have proven that the earth is composed of seven zones, identified from the inner to the outer layers as follows:
(1)  The Solid Inner Core of Earth: 1.7% of the Earth’s mass; depth of 5,150 - 6,370 kilometers (3,219 - 3,981 miles)
The inner core is solid and unattached to the mantle, suspended in the molten outer core.  It is believed to have solidified as a result of pressure-freezing which occurs to most liquids when temperature decreases or pressure increases.
(2)  The Liquid Outer core: 30.8% of Earth’s mass; depth of 2,890 - 5,150 kilometers (1,806 - 3,219 miles)
The outer core is a hot, electrically conducting liquid within which convective motion occurs.  This conductive layer combines with Earth’s rotation to create a dynamo effect that maintains a system of electrical currents known as the Earth’s magnetic field.  It is also responsible for the subtle jerking of Earth’s rotation.  This layer is not as dense as pure molten iron, which indicates the presence of lighter elements.  Scientists suspect that about 10% of the layer is composed of sulfur and/or oxygen because these elements are abundant in the cosmos and dissolve readily in molten iron.
(3)  The “D” Layer: 3% of Earth’s mass; depth of 2,700 - 2,890 kilometers (1,688 - 1,806 miles)
This layer is 200 to 300 kilometers (125 to 188 miles) thick and represents about 4% of the mantle-crust mass.  Although it is often identified as part of the lower mantle, seismic discontinuities suggest the “D” layer might differ chemically from the lower mantle lying above it.  Scientists theorize that the material either dissolved in the core, or was able to sink through the mantle but not into the core because of its density.
(4)  Lower Mantle: 49.2% of Earth’s mass; depth of 650 - 2,890 kilometers (406 -1,806 miles)
The lower mantle contains 72.9% of the mantle-crust mass and is probably composed mainly of silicon, magnesium, and oxygen.  It probably also contains some iron, calcium, and aluminum.  Scientists make these deductions by assuming the Earth has a similar abundance and proportion of cosmic elements as found in the Sun and primitive meteorites.
(5)  Middle Mantle (Transition region): 7.5% of Earth’s mass; depth of 400 - 650 kilometers (250-406 miles)
The transition region or mesosphere (for middle mantle), sometimes called the fertile layer, contains 11.1% of the mantle-crust mass and is the source of basaltic magmas.  It also contains calcium, aluminum, and garnet, which is a complex aluminum-bearing silicate mineral.  This layer is dense when cold because of the garnet.  It is buoyant when hot because these minerals melt easily to form basalt which can then rise through the upper layers as magma.
(6)  Upper Mantle: 10.3% of Earth’s mass; depth of 10 - 400 kilometers (6 - 250 miles)
The upper mantle contains 15.3% of the mantle-crust mass.  Fragments have been excavated for our observation by eroded mountain belts and volcanic eruptions.  Olivine (Mg,Fe)2SiO4 and pyroxene (Mg,Fe)SiO3 have been the primary minerals found in this way.  These and other minerals are refractory and crystalline at high temperatures; therefore, most settle out of rising magma, either forming new material or never leaving the mantle.  Part of the upper mantle called the asthenosphere might be partially molten.
(7)  Lithosphere
Oceanic crust: 0.099% of Earth’s mass; depth of 0-10 kilometers (0 - 6 miles)
The rigid, outermost layer of the Earth comprising the crust and upper mantle is called the lithosphere.  The oceanic crust contains 0.147% of the mantle-crust mass.  The majority of the Earth’s crust was made through volcanic activity.  The oceanic ridge system, a 40,000-kilometer (25,000 mile) network of volcanoes, generates new oceanic crust at the rate of 17 km3 per year, covering the ocean floor with basalt.  Hawaii and Iceland are two examples of the accumulation of basalt piles.
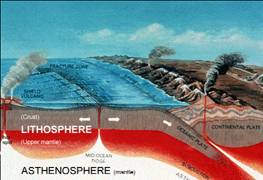
This image shows a cross section through the earth’s crust and upper mantle showing lithosphere plates (made of the crust layer and the top part of the mantle) moving over the asthenosphere (upper mantle).  Windows to the Universe, at (http://www.windows.ucar.edu) at the University Corporation for Atmospheric Research (UCAR).  ©1995-1999, 2000 The Regents of the University of Michigan; ©2000-05 University Corporation for Atmospheric Research.  Continental crust: 0.374% of Earth’s mass; depth of 0-50 kilometers (0 - 31 miles)
The continental crust contains 0.554% of the mantle-crust mass.  This is the outer part of the Earth composed essentially of crystalline rocks.  These are low-density buoyant minerals dominated mostly by quartz (SiO2) and feldspars (metal-poor silicates).  The crust (both oceanic and continental) is the surface of the Earth; as such, it is the coldest part of our planet.  Because cold rocks deform slowly, we refer to this rigid outer shell as the lithosphere (the rocky or strong layer).
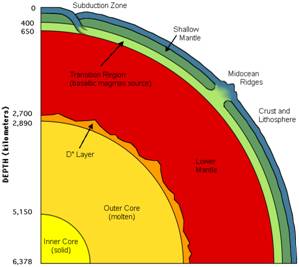
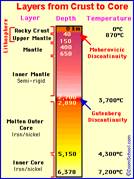
This image shows the divisions of the Earth’s interior into 7 layers.  (Adapted from Beatty, 1990).

Conclusion

The layers of the earth coincide with the above mentioned hadith of the Prophet.  The miracle is in two matters:
(1)  The expression of the hadith, ‘He will sink down the seven earths on the Day of Resurrection,’ indicates the stratification of these “earths” around one center.
(2)  The accuracy with which the Prophet of Islam referred to the seven inner layers of earth.
The only way for a desert dweller to have known these facts 1400 years ago is through revelation from God.

References

Beatty, J. K. and A. Chaikin, eds.  The New Solar System.  Massachusetts: Sky Publishing, 3rd Edition, 1990.
Press, Frank and Raymond Siever.  Earth.  New York: W. H. Freeman and Company, 1986.
Seeds, Michael A. Horizons. Belmont, California: Wadsworth, 1995.
El-Najjar, Zaghloul.  Treasures In The Sunnah: A Scientific Approach: Cairo, Al-Falah Foundation, 2004.

VB.Net Connection With MySQL

Before we begin, to use MySQL with VB.NET you will need to download the MySQL Connector/NET which is available from
http://dev.mysql.com.../connector/net/. At the time of writing, the newest version is 6.1. The installer will install
the connector on your system ready for use.

Once the connector is installed, start a new project in VB.NET (Im using 2008) and you will then need to add a reference to the connector.

Choose "Add Reference" from the Project menu, then select "Browse" and browse to the installation folder where the connector was installed,
choose "MySQL.Data.dll" .

Resized to 65% (was 781 x 390) - Click image to enlargeAttached Image


You may also have to add a reference to "System.data.dll". Now inport the Connector/NET to use its Namespace.
1Imports MySql.Data.MySqlClient


Save the project.

Now lets design the form,
Place 3 labels, 3 text boxes and 2 buttons onto your form. Change the labels to the following "Server", "Username" and "Password".
Name the textboxes to the following "txtServer", "txtLogin", "txtPassword". Change the buttons to "Login" and "Cancel".

It should look like the picture below.
Attached Image

Double click the Cancel button and add the following code into the Sub Function. This will close the application when the Cancel button us pressed.
1Application.Exit()


Now we need to add a MySQLConnection object, to do this - add the following to the "Public Class" of the form. Click the Login button and add the following.
1Dim MysqlConn as MySQLConnection


Next, add the following to instanciate the MySQLConnection object.
1MysqlConn = New MySqlConnection()


Now to set the connection string which will be used - this is similar to say - connecting to an MS Access database.
Here is an example of a connection string. This is a reflection on my test database I have set up, hence there is no password.
1server=localhost; user id=root; password=; database=test


Instead of having a hard coded connection (which of course you can for security), we will be using the textboxes that are on the form like so.
1MysqlConn.ConnectionString = "server=" & txtServer.Text & ";" _
2    & "user id=" & txtUsername.Text & ";" _
3    & "password=" & txtPassword.Text & ";" _
4    & "database=test"


Now we want to actually Open the connection, so we add this to the Login button precedure.
1MysqlConn.Open()


Lets add a message box to show if the connection has been open successfully.
1MessageBox.Show("Connection to Database has been opened.")


Lastly, now that we have opened the connection, and because we wont be using any tables in this tutorial, we will close the connection and then
free the resources used.
1MysqlConn.Close()
2MysqlConn.Dispose()


We can if we wanted to and it is good programming, is to catch any errors - when the connection cannot be opened, you will be notified by a message box,
so we will use the Try, Catch and Finally method.
1Try
2   Mysql.conn.Open()
3   MessageBox.Show("Connection to Database has been opened.")
4   Mysqlconn.Close()
5 Catch myerror As MySqlException
6   MessageBox.Show("Cannot connect to database: " & myerror.Message)
7 Finally
8   Mysql.conn.Dispose()
9 End Try


And this is what all your code should look like,
01Imports MySql.Data.MySqlClient
02Public Class frmLogin
03 
04    Private Sub btnCancel_Click(ByVal sender As System.Object, ByVal e As System.EventArgs) Handles BtnCancel.Click
05        Application.Exit()
06    End Sub
07    Dim MysqlConn As MySqlConnection
08    Private Sub btnLogin_Click(ByVal sender As System.Object, ByVal e As System.EventArgs) Handles btnLogin.Click
09 
10 
11        MysqlConn = New MySqlConnection()
12 
13        MysqlConn.ConnectionString = "server=" & txtServer.Text & ";" _
14        & "user id=" & txtUsername.Text & ";" _
15        & "password=" & txtPassword.Text & ";" _
16        & "database=test"
17 
18        Try
19            MysqlConn.Open()
20            MessageBox.Show("Connection to Database has been opened.")
21            MysqlConn.Close()
22        Catch myerror As MySqlException
23            MessageBox.Show("Cannot connect to database: " & myerror.Message)
24        Finally
25            MysqlConn.Dispose()
26        End Try
27 
28    End Sub
29End Class


Now lets save the application, and then run it and try it.

Connection Successful.
Resized to 96% (was 524 x 234) - Click image to enlargeAttached Image


Connection UnSuccessful - using a password for a non-password protected connection.
Resized to 67% (was 752 x 233) - Click image to enlargeAttached Image


Attached Image

Create a Water Drop With Corel Draw

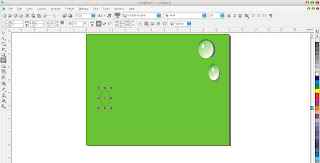
Tutorials which I bring this time is how to create water droplets with coreldraw. First we need rectangle that will be used to for base.


 Press f7 on the keyboard to create an elips. Pres ctrl+c in the active elips and then press crtl+v in the same place three times.
Drag the elipses anywhare you want until the elipses do not overlap anymore. Paint one of elipse with gray. Then remove outline of the steps as in the picture beside this.


Color one of elipse again with green and remove outline such the ways above. Use the interactive fill tool to colorize this one.More detail take a look at the picture beside.


 pain one another elipse with green that are more dark then the previouse elips.
activated the green elipse then click to front,place the green elipse onto tgray elipse.


Do the step above on the other elipse


create smaller elipse and paint with the white one. Click Interaktive Shadow Tool to make efek glossy.
 for more colorize detail take a look at the picture beside.
 

drag it onto green elips like picture beside. And the result like this. Good luck!!

Why Pork Is Bad

 He has only forbidden you carrion, blood and pork
and what has been consecrated to other than Allah.
But anyone who is forced to eat it-without desiring it
or going to excess in it-commits no crime. Allah is
Ever-Forgiving, Most Merciful.
(Qur'an 2:173)

Eating pork is harmful to health in a great many regards. This harm still persists today, despite all the precautions that are taken. First and foremost, no matter how clean the farms and  environments on which it is raised may be, the pig is not by nature a clean-living animal. It often plays in, and even eats, its own excrement. Due to this and its biological structure, the pig roduces much higher levels of antibodies in its body than other animals. In addition, far higher levels of growth hormone are produced in the pig compared to those in other animals and human beings. Naturally, these high levels of antibodies and growth hormone pass across to and collect in the pig's muscle tissue. Pork meat also contains high levels of cholesterol and lipids. It has been scientifically proven that these significant amounts of antibodies, hormones, cholesterol and lipids in pork represent a serious threat to human health.

The existence of above-average numbers of obese individuals in the populations of countries such as the USA and Germany, in which large quantities of pork are consumed, is now well-known. When exposed to excessive quantities of growth hormone as a result of a pork-based diet, the human body first puts on excessive weight and then suffers physical deformations.

Another harmful substance in pork is the "trichina" worm. This is frequently found in pork and when it enters the human body, it settles directly in the muscles of the heart and represents a possibly fatal threat. Even though it is now technically possible to identify pigs that are infected with trichina, no such methods were known in earlier centuries. That means that everyone who ate pork risked infection by trichina and possible death.


All these reasons are just a part of the wisdom in our Lord's prohibition on the consumption of pork. Moreover, this commandment of our Lord's provides complete protection from the harmful effects of pork under any conditions.

Until the 20th century, it was impossible to be aware of the danger posed to human health by pork. The fact that the Qur'an, revealed fourteen centuries ago, warns against this harm which has been incontrovertibly revealed with modern medical equipment and biological tests, is one of the miracles demonstrating that the Qur'an is the revelation of Allah, the Omniscient. Despite all the precautionary measures and inspections that take place in modern-day pig rearing, the fact that pork is physiologically incompatible with the human body and is a variety of meat harmful to human health has not altered.


The Water Cycle


“Seest thou not that Allah sends down rain from the sky, and leads it through springs in the earth?  then He causes to grow, therewith, produce of various colours.”
(Qur’an 39:21)

 “By the Firmament which returns (in its round),”
(Qur’an 86:11)

“He sends down rain from the sky and with it gives life to the earth after it is dead: Verily in that are Signs for those who are wise.”
(Qur’an 30:24)

“And We send down water from the sky according to (due) measure, and We cause it to soak in the soil; and We certainly are able to drain it off (with ease).”
(Qur’an 23:18) 

 
 “And We send the fecundating winds, then cause the rain to descend from the sky, therewith providing you with water (in abundance).”
(Qur’an 15:22)

 “Seest thou not that Allah makes the clouds move gently, then joins them together, then makes them into a heap?– then wilt thou see rain issue forth from their midst. And He sends down from the skymountain masses (of clouds) wherein is hail: He strikes therewith whom He pleases and He turns it away from whom He pleases. the vivid flash of His lightning well-nigh blinds the sight.”
(Qur’an 24:43)

“It is Allah Who sends the Winds, and they raise the Clouds: then does He spread them in the sky as He wills, and break them into fragments, until thou seest raindrops issue from the midst thereof: then when He has made them reach such of His servants as He wills, behold, they do rejoice!”
(Qur’an 30:48)

Monday, May 20, 2013

Nasehat Kehidupan – Saudagar Kaya dan 4 Istrinya

 
Suatu ketika, ada seorang saudagar kaya yang mempunyai 4 orang istri. Dia mencintai istri yang keempat, dan menganugerahinya harta dan kesenangan yang banyak. Sebab, dialah yang tercantik diantara semua istrinya. Pria ini selalu memberikan yang terbaik buat istri keempatnya ini.
Pedagang itu juga mencintai istrinya yang ketiga. Dia sangat bangga dengan istrinya ini, dan selalu berusaha untuk memperkenalkan wanita ini kepada semua temannya. Namun, ia juga selalu khawatir kalau istrinya ini akan lari dengan pria yang lain.
Begitu juga dengan istri yang kedua. Ia pun sangat menyukainya. Ia adalah istri yang sabar dan pengertian. Kapanpun pedagang ini mendapat masalah, dia selalu meminta pertimbangan istrinya ini. Dialah tempat bergantung. Dia selalu menolong dan mendampingi suaminya, melewati masa-masa yang sulit. Sama halnya dengan istri yang pertama. Dia adalah pasangan yang sangat setia. Dia selalu membawa perbaikan bagi kehidupan keluarga ini. Dia lah yang merawat dan mengatur semua kekayaan dan usaha sang suami. Akan tetapi, sang pedagang, tak begitu mencintainya. Walaupun sang istri pertama ini begitu sayang padanya, namun, pedagang ini tak begitu mempedulikannya.
Suatu ketika, si pedagang sakit. Lama kemudian, ia menyadari, bahwa ia akan segera meninggal. Dia meresapi semua kehidupan indahnya, dan berkata dalam hati. “Saat ini, aku punya 4 orang istri. Namun, saat aku meninggal, aku akan sendiri. Betapa menyedihkan jika aku harus hidup sendiri.”
Lalu, ia meminta semua istrinya datang, dan kemudian mulai bertanya pada istri keempatnya. “Kaulah yang paling kucintai, kuberikan kau gaun dan perhiasan yang indah. Nah, sekarang, aku akan mati, maukah kau mendampingiku dan menemaniku? Ia terdiam. “Tentu saja tidak, “jawab istri keempat, dan pergi begitu saja tanpa berkata-kata lagi.
Jawaban itu sangat menyakitkan hati. Seakan-akan, ada pisau yang terhunus dan mengiris-iris hatinya.
Pedagang yang sedih itu lalu bertanya pada istri ketiga. “Akupun mencintaimu sepenuh hati, dan saat ini, hidupku akan berakhir. Maukah kau ikut denganku, dan menemani akhir hayatku? Istrinya menjawab, Hidup begitu indah disini. Aku akan menikah lagi jika kau mati. Sang pedagang begitu terpukul dengan ucapan ini. Badannya mulai merasa demam.
Lalu, ia bertanya pada istri keduanya. “Aku selalu berpaling padamu setiap kali mendapat masalah. Dan kau selalu mau membantuku. Kini, aku butuh sekali pertolonganmu. Kalau ku mati, maukah kau ikut dan mendampingiku? Sang istri menjawab pelan. “Maafkan aku,” ujarnya “Aku tak bisa menolongmu kali ini. Aku hanya bisa mengantarmu hingga ke liang kubur saja. Nanti, akan kubuatkan makam yang indah buatmu.
Jawaban itu seperti kilat yang menyambar. Sang pedagang kini merasa putus asa.
Tiba-tiba terdengar sebuah suara. “Aku akan tinggal denganmu. Aku akan ikut kemanapun kau pergi. Aku, tak akan meninggalkanmu, aku akan setia bersamamu.”
Sang pedagang lalu menoleh ke samping, dan mendapati istri pertamanya disana. Dia tampak begitu kurus. Badannya tampak seperti orang yang kelaparan. Merasa menyesal, sang pedagang lalu bergumam, “Kalau saja, aku bisa merawatmu lebih baik saat ku mampu, tak akan kubiarkan kau seperti ini, istriku.”
Renungan :
Sahabat Tercinta, sesungguhnya kita punya 4 orang istri dalam hidup ini.
Istri yang keempat, adalah tubuh kita. Seberapapun banyak waktu dan biaya yang kita keluarkan untuk tubuh kita supaya tampak indah dan gagah, semuanya akan hilang. Ia akan pergi segera kalau kita meninggal. Tak ada keindahan dan kegagahan yang tersisa saat kita menghadap-Nya.
Istri yang ketiga, adalah status sosial dan kekayaan. Saat kita meninggal, semuanya akan pergi kepada yang lain. Mereka akan berpindah, dan melupakan kita yang pernah memilikinya.
Sedangkan istri yang kedua, adalah kerabat dan teman-teman. Seberapapun dekat hubungan kita dengan mereka, mereka tak akan bisa bersama kita selamanya. Hanya sampai kuburlah mereka akan menemani kita.
Dan, teman, sesungguhnya, istri pertama kita adalah jiwa dan amal kita. Mungkin, kita sering mengabaikan, dan melupakannya demi kekayaan dan kesenangan pribadi. Namun, sebenarnya, hanya jiwa dan amal kita sajalah yang mampu untuk terus setia dan mendampingi kemanapun kita melangkah. Hanya amal yang mampu menolong kita di akhirat kelak.
Jadi, selagi mampu, perlakukanlah jiwa dan amal kita dengan bijak. Jangan sampai kita menyesal belakangan.
Mumpung masih hidup …
Mumpung masih sehat …
Mumpung masih longgar …
Mumpung masih muda …

Pearls of Islamic Wisdom

Custom image
Luqman was a wise person known to be from Jerusalem. It is said that he was a judge during Prophet Dawud’s (David’s) time. According to Ibn ‘Abbas (May Allah be pleased with him), he was an Ethiopian slave who worked as a carpenter.
Luqman’s wisdom is mentioned in the Quran in Surah Luqman. A summary of his wisdom from the Quran is covered in the post “Luqman’s Wisdom.”
In his book “Stories of the Quran”, Ibn Kathir has included more of his wisdom as narrated by others. Some of his wise sayings as he preached to people are covered below. They are similar to the message that prophet Muhammad brought hundreds of years later.
  • “Wisdom dictates: O my son: Let your speech be good and your face be smiling, you will be more loved by the people than those who give them provisions.”
  • “Kindness is the head of wisdom.”
  • “As you show mercy (to others), mercy will be shown to you.”
  • “You will gain what you give (or, harvest what you grow).”
  • “Love your friend and the friend of your father.”
islam on Pearls of Islamic Wisdom
  • Luqman was asked: Who is the best one in terms of patience?
  • Luqman’s Answer: It is the one who practices no harm after observing patience.
  • Luqman was asked: Who is the best one in terms of knowledge?
  • Luqman’s Answer: It is he who adds to his own knowledge through the knowledge of others.
  • Luqman was asked: Who is the best from among the whole people?
  • Luqman’s Answer: It is the wealthy. They said: Is it the one who has properties and riches? He said: No! But, it is the one if whose good was sought, he would not hold it back or prevent it. And, it is the one who does not need anything from others.
  • Luqman was asked: Who is the worst of all people?
  • Luqman’s Answer: It is the one who does not feel shame if found committing a sinful deed.
[Source: Stories of the Quran by ibn Katheer]

6 Most Popular Android Games

1. Angry Birds

The amazingly popular iOS game moved to Android a while ago, earning over two million downloads during its first weekend of availability.
The Android version is free, unlike the Apple release, with maker Rovio opting to stick a few adverts on it rather than charge an upfront fee. The result is a massive and very challenging physics puzzler that's incredibly polished and professional. For free. It defies all the laws of modern retail.
Angry Birds for Android was first available to download from app store GetJar but is now available through Google Play.
Disney and Imangi Studios present Temple Run: Oz – a brand-new endless runner inspired by Temple Run 2 and the film Oz the Great and Powerful. Play as Oz and outrun the shrieking flying baboons as you turn, jump and slide your way across the land. Begin your exhilarating adventure now and see how far you can run!
Angry Brids

2. Temple Run : OZ

Disney and Imangi Studios present Temple Run: Oz – a brand-new endless runner inspired by Temple Run 2 and the film Oz the Great and Powerful. Play as Oz and outrun the shrieking flying baboons as you turn, jump and slide your way across the land. Begin your exhilarating adventure now and see how far you can run!

3. Angry Birds Star Wars 

The Angry physics phenomenon took a turn for the weird late in 2012, with Rovio acquiring the rights to blend Star Wars characters with its popular Angry Birds play mechanics. Angry Birds Star Wars is actually pretty nice, with players using Star Wars weaponry to smash down scenery alongside the usual destructive physics action. Not the car crash IP clash we were expecting.
Angry Birds Star Wars 

4. Tap Fish

A nice looking little aquarium, that combines the timeless hobby of staring at goldfish with game elements based around breeding new varieties. There's a slight sting in the tail here in that Tap Fish is one of the initial wave of "freemium" Android games brought into life thanks to Google's launch of in-app billing. The really cool new stuff costs little bits of money.

Tap Fish

5. Pitfall

Developer Activision has updated one of its oldest and most fondly remembered classics, turning the ancient platform game into a posh, 3D infinite running thing. Pitfall uses swipe and tilt controls like the famous Temple Run, including power-ups, vehicles and changing camera angles to add a bit of variety to the look and feel of it all.
Pitfall

6. CSR Racing

CSR Racing
The best cars require in-app purchases, but there's plenty of free fun to be had with this fast and furious racer. Console-quality graphics show off the mean machines (from Audi, BMW, Bentley and others), and gameplay blends strategy as well as speed.


Build A Tin Can WiFi Antenna


click on image to enlarge
Got no dough for a commercial WiFi antenna? Looking for an inexpensive way to increase the range of your wireless network? A tin can waveguide antenna, or Cantenna, may be just the ticket. This design can be built for under $5 U.S. and reuses a food, juice, or other tin can. I am not an electrical engineer, nor do I have access to any fancy test equipment. I've built some antennas that worked for me and thought I would share what I learned. I have no idea if this is safe for your radio or wireless network equipment. The risk to you and your equipment is yours.
Building your Cantenna is easy, just follow these steps.
  1. Collect the parts
  2. Drill or punch holes in your can to mount the probe
  3. Assemble the probe and mount in can

Collect the parts:

You'll need:
  • A N-Female chassis mount connector.
  • Four small nuts and bolts
  • A bit of thick wire
  • A can
These vendors can supply the parts (the wire and can you provide yourself).
The Connector
A N type Female Chassis-mount connector. One side is N-female for connecting the cable from your wireless equipment, and the other side has a small brass stub for soldering on wire. These can be found at electronics stores internet suppliers (see the list below under "Connect your antenna..." If you shop around, you should be able to find these for $3-$5.

Nuts & Bolts
You'll need them just long enough to go through the connector and the can. I've used #6x1/4" stainless. If your N-connector is a screw on type, then you won't need the nuts and bolts.

Wire
You'll need about 1.25" of 12 guage copper wire. This wire will stick into the brass stub in the N-connector.
A Can
This is the fun part. You're looking for a can between about 3" and 3 2/3" in diameter. The size doesn't have to be exact. I made a good antenna with a Nalley's "Big Chunk" Beef Stew can that was 3.87" in diameter. Others have reported good results with big 39oz. coffee cans that are 6" in diameter. The pringles can is really too small for good performance, however. Try to get as long a can as possible. The old fashioned fruit juice cans should work well.

Click on image to enlarge


Drill or punch holes in your can to mount the probe

The N-connector assembly will mount in the side of your can. You need to put holes in the right place to mount the connector. The placement of the hole and connect is very important. It's location is derived from formulas that use the frequency that the antenna will operate at and the can diameter. To make life easy on you, here's a calculator to figure it out for you.

Can Diameter

Cuttoff Frequency in MHz for TE11 mode MHz
Cuttoff Frequency in Mhz for TM01 mode MHz
Guide Wavelength in Inches inches
1/4 Guide Wavelength inches
3/4 Guide Wavelength inches
Enter the diameter of your can above and click on the calculate button. 802.11b and 802.11g WiFi networking equipment operates at a range of frequencies from 2.412 GHz to 2.462 GHz. Ideally, with your can size, the TE11 cut-off frequency should be lower than 2.412 and the TM01 cut-off should be higher than 2.462. It would be good, also, if your can is longer than the 3/4 Guide Wavelength. If your can is a little off in length or diameter, don't despair, experimentation is fun!
You want to mark the location on the can where you will put the hole for the connector. The 1/4 Guide Wavelength number tells you how far up from the bottom metal end of the can to put the center of the hole. Open only one end of your can, eat the contents, and give it a good washing. You'll probably want to remove the label too. Use a ruler to measure up from the closed end 1/4 Guide Wavelength and mark the can with a dot.
If you've got a drill, select a bit that matches the size of the center of your connector. You may want to start with a small bit and work the hole larger and larger. You could even start with a hammer and nail, then use drill bits. If you don't have a drill, start with a nail hole and use a file to get the hole to the required size. If you're using a bolt on connector, make four more holes for the bolts - you can use the connector as a drilling guide.


Click on image to enlarge

Assemble the probe and mount in can

Now you'll need that bit of wire. You'll need a soldering iron or a friend with one as well. Cut the wire so that when it is stuck in the connector as shown, the total length of both the brass tube and wire sticking out past the connector is 1.21". Get as close to this length as you can.
When you've got your wire correctly sized, solder it into the connector keeping it as straight and upright as you can. When it's cooled, bolt or screw the assembly into your can. Put the heads of the bolts inside the can and the nuts on the outside to minimize the obstructions in your antenna. Your Done!

Connect your antenna to your wireless card or access point

To use your cantenna, you'll need a special cable commonly called a "Pig Tail". The pig tail connects your wireless card or access point to you antenna. One end of the cable will have a "N" Male connector (just right for connecting your your cantenna), while the other end will have a connector appropriate to your card or access point. For a good picture of a pig tail, take a look at:
http://www.seattlewireless.net/index.cgi?PigTail
You'll want to have a wireless NIC or access point with an external antenna connector. Otherwise, you may have to hack into the one you have to hook up the cable. I wouldn't recommend this unless you're good with a soldering iron and electronics. For this reason, I like the Agere Orinoco cards which have a nice antenna connector. Pig Tails can be hand made if you have the right tools, but it's probably easier to get a pre-made one. Try:
Hook up your cable, point the antenna at a friend's, and see how far you can stretch you network. Be sure to let me know (greg@turnpoint.net) how it works.
This antenna has linear polarization. That means that how you rotate the antenna will affect the strength of your signal. Usually, you will want to put the connection straight down, but experiment with rotating the can while watching the signal strength on your PC to get the best performance.
For more information, check out these resources:

Auto Suggestion with PHP, jQuery, MySQL and XML

I will tell you about implementation autocomplete for your sites. Data can be located in different sources – directly in the JS code, in the database, and even in the XML file.

Step 1. HTML

Here are HTML layout for our autocomplete example page:

index.html

01<!DOCTYPE html>
02<html lang="en" >
03    <head>
04        <meta charset="utf-8" />
05        <title>Autocomplete with PHP, jQuery, MySQL and XML | Script Tutorials</title>
06
07        <link href="css/jquery.autocomplete.css" rel="stylesheet" type="text/css" />
08        <link href="css/main.css" rel="stylesheet" type="text/css" />
09        <script type="text/javascript" src="js/jquery-1.5.2.min.js"></script>
10        <script type="text/javascript" src="js/jquery.autocomplete.pack.js"></script>
11        <script type="text/javascript" src="js/script.js"></script>
12    </head>
13    <body>
14        <div class="container">
15            <form action="#">
16                <p><label>Your month:</label> <input id="month" type="text" autocomplete="off"></p>
17                <p><label>Your year:</label> <input id="year" type="text" autocomplete="off"></p>
18                <p><label>Your country:</label> <input id="country" type="text" autocomplete="off"></p>
19            </form>
20        </div>
21        <footer>
22            <h2>Autocomplete with PHP, jQuery, MySQL and XML</h2>
23            <a href="http://www.script-tutorials.com/autocomplete-with-php-jquery-mysql-and-xml/" class="stuts">Back to original tutorial on <span>Script Tutorials</span></a>
24        </footer>
25    </body>
26</html>

Step 2. CSS

Now, lets define all used styles:

css/main.css

001*{
002    margin:0;
003    padding:0;
004}
005
006body {
007    background-repeat:no-repeat;
008    background-color:#bababa;
009    background-image: -webkit-radial-gradient(600px 200px, circle, #eee, #bababa 40%);
010    background-image: -moz-radial-gradient(600px 200px, circle, #eee, #bababa 40%);
011    background-image: -o-radial-gradient(600px 200px, circle, #eee, #bababa 40%);
012    background-image: radial-gradient(600px 200px, circle, #eee, #bababa 40%);
013    color:#fff;
014    font:14px/1.3 Arial,sans-serif;
015    min-height:600px;
016}
017
018footer {
019    background-color:#212121;
020    bottom:0;
021    box-shadow: 0 -1px 2px #111111;
022    display:block;
023    height:70px;
024    left:0;
025    position:fixed;
026    width:100%;
027    z-index:100;
028}
029
030footer h2{
031    font-size:22px;
032    font-weight:normal;
033    left:50%;
034    margin-left:-400px;
035    padding:22px 0;
036    position:absolute;
037    width:540px;
038}
039
040footer a.stuts,a.stuts:visited{
041    border:none;
042    text-decoration:none;
043    color:#fcfcfc;
044    font-size:14px;
045    left:50%;
046    line-height:31px;
047    margin:23px 0 0 110px;
048    position:absolute;
049    top:0;
050}
051
052footer .stuts span {
053    font-size:22px;
054    font-weight:bold;
055    margin-left:5px;
056}
057
058.container {
059    border:3px #111 solid;
060    color:#000;
061    margin:20px auto;
062    padding:20px;
063    position:relative;
064    text-align:center;
065    width:300px;
066
067    border-radius:15px;
068    -moz-border-radius:15px;
069    -webkit-border-radius:15px;
070}
071
072.ac_results  {
073    border: solid 1px #E5E5E5;
074    color:#000;
075
076    border-radius:0 0 5px 5px;
077    -moz-border-radius:0 0 5px 5px;
078    -webkit-border-radius:0 0 5px 5px;
079}
080.ac_over {
081    background-color:#444;
082}
083
084form p {
085    margin-bottom:5px;
086    text-align:right;
087}
088
089form input {
090    background-color: #FFFFFF;
091    background: -moz-linear-gradient(top, #FFFFFF, #EEEEEE 1px, #FFFFFF 25px);
092    background: -webkit-gradient(linear, left top, left 25, from(#FFFFFF), color-stop(4%, #EEEEEE), to(#FFFFFF));
093    border: solid 1px #E5E5E5;
094    font-size:14px;
095    outline: 0;
096    padding: 9px;
097    width: 180px;
098
099    border-radius:5px;
100    -moz-border-radius:5px;
101    -webkit-border-radius:5px;
102
103    box-shadow: rgba(0,0,0, 0.1) 0px 0px 8px;
104    -moz-box-shadow: rgba(0,0,0, 0.1) 0px 0px 8px;
105    -webkit-box-shadow: rgba(0,0,0, 0.1) 0px 0px 8px;
106}
107
108form  input:hover, form  input:focus {
109    border-color: #C9C9C9;
110
111    box-shadow: rgba(0,0,0, 0.5) 0px 0px 8px;
112    -moz-box-shadow: rgba(0,0,0, 0.5) 0px 0px 8px;
113    -webkit-box-shadow: rgba(0,0,0, 0.5) 0px 0px 8px;
114}
In our package you can find few more files:

css/jquery.autocomplete.css + css/indicator.gif

Both files I got from autocomplete jquery package (this is default files – don`t need to re-publish it in our article)

Step 3. Javascript

Its time to prepare JS:

js/script.js

01$(function(){
02
03    $('#month').autocomplete(['January', 'February', 'March', 'April', 'May', 'June', 'July', 'August', 'September', 'October', 'November', 'December'], {
04        width: 200,
05        max: 3
06    });
07
08    $('#year').autocomplete('data.php?mode=xml', {
09        width: 200,
10        max: 5
11    });
12
13    $('#country').autocomplete('data.php?mode=sql', {
14        width: 200,
15        max: 5
16    });
17
18});
As you can see – very easy syntax of using Autocomplete. In first case I hardcoded possible values directly in JS code. Second and third cases – through PHP file (using different way of obtaining data – XML and SQL). In package you can find two another JS files:

js/jquery-1.5.2.min.js + js/jquery.autocomplete.pack.js

This is jQuery library itself plus Autocomplete plugin

Step 4. SQL

Now, lets prepare our database – lets add 1 new table:
01CREATE TABLE `s85_countries` (
02  `country_code` varchar(2) NOT NULL,
03  `country_name` varchar(255) NOT NULL,
04  PRIMARY KEY  (`country_code`)
05) ENGINE=MyISAM  DEFAULT CHARSET=utf8;
06
07INSERT INTO `s85_countries` (`country_code`, `country_name`) VALUES
08('AR', 'Argentina'),
09('AU', 'Australia'),
10('BR', 'Brazil'),
11('CA', 'Canada'),
12('CN', 'China'),
13('IN', 'India'),
14('KZ', 'Kazakhstan'),
15('RU', 'Russia'),
16('SD', 'Sudan'),
17('US', 'United States');
This small table contain several records – list of countries. I took that SQL code from one of our old tutorials.

Step 5. PHP

This step most important – now you will see how we returning data for Autocomplete:

data.php

01<?php
02
03if (version_compare(phpversion(), "5.3.0", ">=")  == 1)
04  error_reporting(E_ALL & ~E_NOTICE & ~E_DEPRECATED);
05else
06  error_reporting(E_ALL & ~E_NOTICE);
07
08require_once('classes/CMySQL.php');
09
10$sParam = $GLOBALS['MySQL']->escape($_GET['q']); // escaping external data
11if (! $sParam) exit;
12
13switch ($_GET['mode']) {
14    case 'xml': // using XML file as source of data
15        $aValues = $aIndexes = array();
16        $sFileData = file_get_contents('data.xml'); // reading file content
17        $oXmlParser = xml_parser_create('UTF-8');
18        xml_parse_into_struct($oXmlParser, $sFileData, $aValues, $aIndexes);
19        xml_parser_free( $oXmlParser );
20
21        $aTagIndexes = $aIndexes['ITEM'];
22        if (count($aTagIndexes) <= 0) exit;
23        foreach($aTagIndexes as $iTagIndex) {
24            $sValue = $aValues[$iTagIndex]['value'];
25            if (strpos($sValue, $sParam) !== false) {
26                echo $sValue . "\n";
27            }
28        }
29        break;
30    case 'sql': // using database as source of data
31        $sRequest = "SELECT `country_name` FROM `s85_countries` WHERE `country_name` LIKE '%{$sParam}%' ORDER BY `country_code`";
32        $aItemInfo = $GLOBALS['MySQL']->getAll($sRequest);
33        foreach ($aItemInfo as $aValues) {
34            echo $aValues['country_name'] . "\n";
35        }
36        break;
37}
We filter the resulting data by incoming parameter $_GET['q'] from the active text field (where we started typing something). The result – the script gives all matching records. Another one file which we using (as always):

classes/CMySQL.php

This is our usual class file to work with database (pretty comfortable). In its constructor you will able to set your own database configuration:
1$this->sDbName = '_DATABASE_NAME_';
2$this->sDbUser = '_DATABASE_USERNAME_';
3$this->sDbPass = '_DATABASE_USERPASS_';

Step 6. XML

Here are content of our XML data file:

data.xml

01<!--?xml version="1.0"?-->
02<items>
03    <item>1991</item>
04    <item>1990</item>
05    <item>1991</item>
06    <item>1992</item>
07    <item>1993</item>
08    <item>1994</item>
09    <item>1995</item>
10    <item>1996</item>
11    <item>1997</item>
12    <item>1998</item>
13    <item>1999</item>
14    <item>2000</item>
15    <item>2001</item>
16    <item>2002</item>
17    <item>2003</item>
18    <item>2004</item>
19    <item>2005</item>
20    <item>2006</item>
21    <item>2007</item>
22    <item>2008</item>
23    <item>2009</item>
24    <item>2010</item>
25    <item>2011</item>
26    <item>2012</item>
27    <item>2013</item>
28    <item>2014</item>
29    <item>2015</item>
30</items>

Share

Twitter Delicious Facebook Digg Stumbleupon Favorites More